
I have this incredibly lovely boy-cat Valentino. As well leash trained he is, and trained to stay off the counters, he can't seem to resist the bathroom sink when I'm not home. For quite a while I had a huge goldfish named Blanche in a tank on that counter, and from what I could guess, Valentino passed some of his "alone time" while I was at work, curled up literally in the bathroom sink watching Blanche swim around. Poor Blanche passed away. But I'm still coming home to cat hair in the sink. Every once in a while I find Valentino standing in the sink, head and ears pointed straight at Blanche's empty tank. I wonder if he misses her as much as I do. The filter is still bubbling away in the empty rank as I contemplate what fish to put in it next. But back to the Hydrogen Peroxide and cat hair. I frequently come home to my 360 square foot apartment to clean out a sink of cat hair. I love Clorox Cleanup. I usually have plenty. I usually get it for free. I make extra income gathering up a crew to empty furniture and everything else out of beachfront condos. I keep the contents. I usually have TONS of cleaning agents. Business has slowed. I ran out of Clorox Cleanup. Turns out I still had a 3/4 full bottle of hydrogen peroxide I bought for $1 at Dollar Tree to kill the bugs on my Basil. (I grow basil in a huge pot with other edibles on my balcony overlooking the ocean.) I also still had the $1 spray bottle I poured my hydrogen peroxide/water bug killer into. Now this was way too easy..... I unscrewed the sprayer out of the $1 bottle (after washing it) and screwed the sprayer into the Hydrogen peroxide bottle. I was frugal enough to screw the peroxide cap (after washing it ) onto the rinsed $1 bottle. 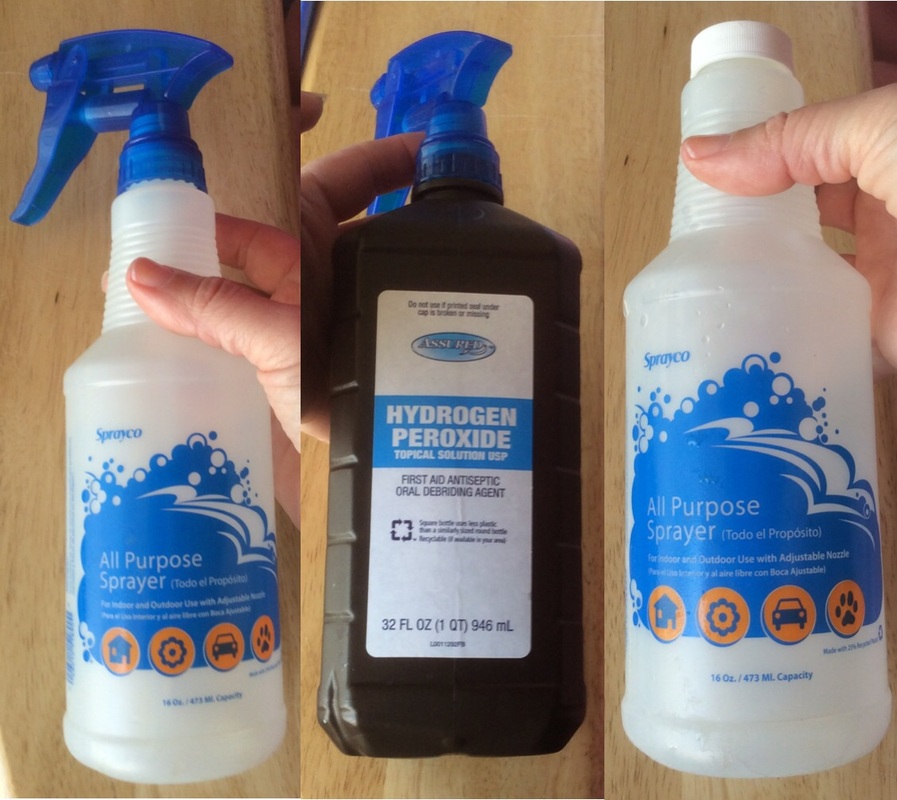
Left photo: $1 spray bottle from Dollar Tree, Center Photo: $1 Hydrogen Peroxide from Dollar Tree with blue sprayer from $1 sprayer bottle. Right photo: the cap from the Peroxide fits the now "sprayer-less" bottle.
Voila! Disinfecting Hydrogen Peroxide spray in a dark bottle that will keep it from bio degrading, and a nice bottle with lid, if I need to make some more cleaning agents later.
For the more fun stuff on Hydrogen Peroxide's disinfecting/antiseptic uses, click here. To answer the nagging question: yes it's the 3% solution Hydrogen Peroxide used straight up, no dilution. I give it 30 second to work and wipe it off. The sink is cultured marble and it looks fine. On a final note Hydrogen Peroxide naturally breaks down to water and oxygen when exposed to light and air (thus the need for a dark bottle). Hope that helps. A frugal and minimal-a double hitter! So what interesting uses do you have for hydrogen peroxide? What natural, frugal and minimalist cleaners do you use? How many different bottles of cleaner are in your home? Leave me a note below and tell me what you think! I love to learn hew things. :D Wishing you an easy cleanup of whatever it may be and a nice glass of red wine afterwards, Rose Marie :)
0 Comments
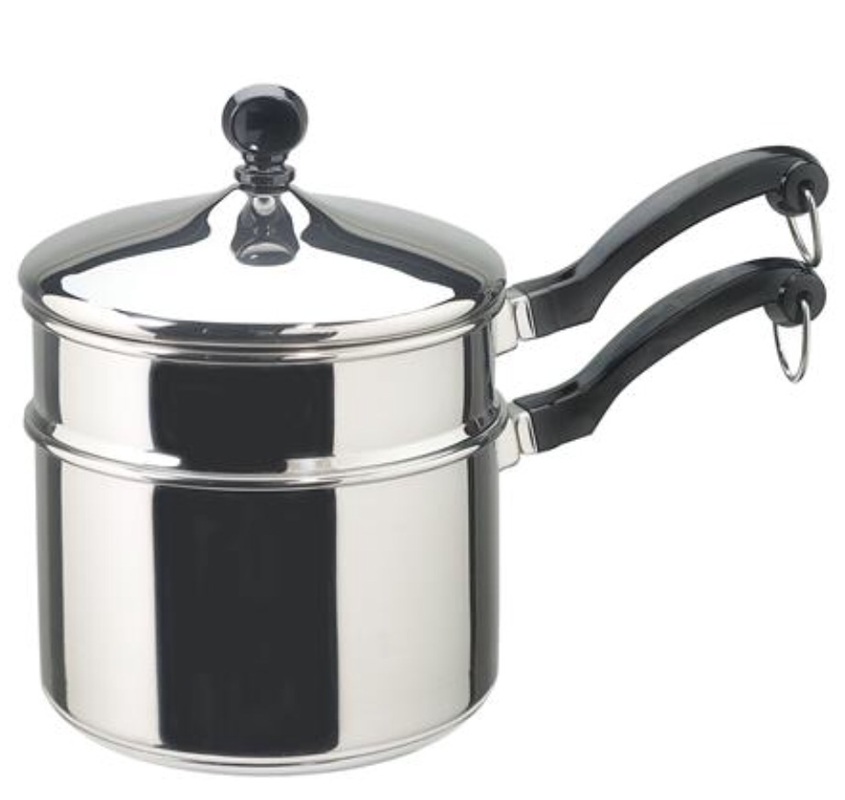 Photo courtesy: http://shop.farberwarecookware.com/Cookware/Farberware-Classic-Series-2-Quart-Covered-Saucepan-with-Double-Boiler-Insert-Silver-50057.html#product-overview Ah, Minimalism.....it sounds so pretty! Clean, streamlined, functional. My goal, all mine! [insert maniacal laugh here] But I jest. Or maybe not? Back to the story of "Downsizing My Life", and I don't mean that evil 4-letter word d*et! In October of 2014, I went from living in a 1250 square foot beach front condo to a 360 square foot 1 room condotel. I donated the following to charity and friends, prior to the move: 2 large skillets, 1 smaller skillet, cake pans, sheet pans, a blender, my microwave (there was already a smaller one where I was going), toaster oven (I was planning a on a new one, later I'll review it for you), mounds of utensils, hot pads, mitts, kitchen towels, a growing pile of plastic storage ware (both the bought kind and recycled tubs, etc.), mixing bowls, tins, you name it. I also gave, to a close friend, my prize Farberware double boiler! Not a mistake, but intentional. I was going to buy a couple of those PIC Induction Burners they keep advertising on TV. I love to cook and could think of no better new "toy !" than a couple of those sleek digital thermostat display thingies! I did get 2 of those cookers and I'll review them here at a later date. Guess what I learned next? You need special "Induction Cookware" for those burners. They can't use what I already had, they won't work, they won't heat up at all! Any cookware that is magnetic, for example cast iron, will work on induction burners. I tested all my cookware with a strong magnet. There was not one, not one, pot or pan I could keep that would work. So, I gave up my beloved 2 Quart Farberware double boiler. Since I hadn't bought new cookware in forever, I decided maybe there was something better out there than what I had. I was trying to stay compact and minimal in kitchen storage space, but still highly functional and affordable. My long, long search was in vain. Since when did having a double boiler in your cache of cookware become unfashionable? I'm in my late 40's. Am I that "unfashionable" already? Lol! I hope not! Not only were they difficult to find, they were too big when I did find them. Or way, way too expensive. Like $200 too expensive! Back to my trusty Farberware! It turns out that old 2 Quart Double Boiler now was now available in Induction, and Farberware was closing out the non-induction cookware in their Farberware Classic line. When I arrived at Bed, Bath & Beyond with my 20% off coupon (always be frugal!) the Induction Classic was full price, the old model was on sale. I now have my double boiler back, induction style! Farberware Classic 2 Quart Double Boiler Review It takes up less space and gives you 2 pots to work with. The insert top pot also has a magnetic base, although it visually doesn't look like it. You can store the lid in the top insert pot either right-side up, or upside-down to put the top knob inside the insert pot, thereby taking up even less space. Both pots heat up quickly and evenly without any "hot spots". Both handles and lid knob stay cool. The set is incredibly durable. In 20+ years of my mom, my grandmother and myself using these the handles never cracked chipped or broke. As many times as we dropped all the pieces, they never dented. The lid fits either pot perfectly, and is contoured to force condensate not steam out the sides, but run down back onto the food below, thus keeping cooking food from drying out. They're easy to clean - even burned on rice! Let to soak a few and the burned rice easily comes off - no elbow grease needed. (I have a tendency to scorch rice, oops...) They keep food in the fridge without adding a metal taste to the food. (Am I the only one in a hurry who has been forced to do this?) They are aluminum free, made of solid stainless steel. They are priced just right at $39.99 the set. (I used a 20% off coupon in store at Bed, Bath & Beyond and saved $7.99, paying only $32 for the set.) Drawbacks: 1--The exterior mirror finish and hard durable plastic handles and knob stay bright and dark when hand washed. My mother used hers for a number of years before she passed away, then I used it for another 10 years before I left it behind. A dishwasher will dull the mirror shine quickly and eventually, given enough years, the handles on my momma's double boiler "whited out". It looked terrible, but it worked fine, didn't get brittle or crack. It just looked odd.  Thick Magnetic Induction bottom on lower pot. I hope this helps in your decision making process, if you are indeed shopping for new cookware. Otherwise, I hope you found it an entertaining read. :)
Please feel free to leave a comment below. What is your fave compact cookware? What one pot or skillet can you not do without? Let me know if you've found "the perfect compact cookware"! Blessings for a great day, Rose Marie :D 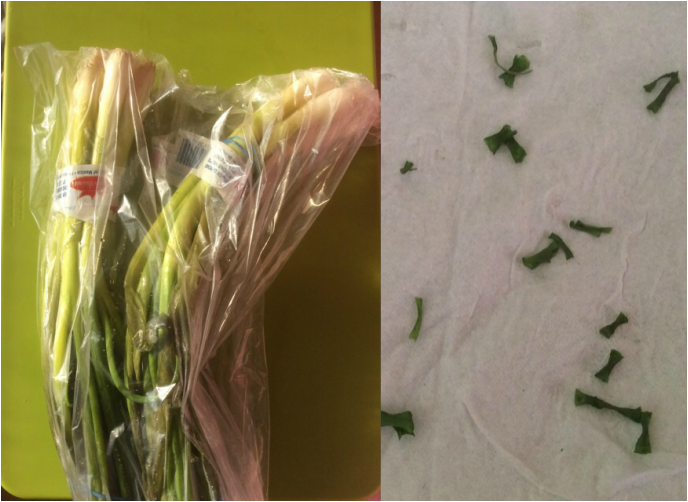 I live in 360 square feet. I love using every bit of whatever I buy or get. Use it up, wear it out, make do, or do without. (To be honest - the "last life left" in my clothes gets given away to charity; my friends don't wear my size.) Food dehydrators are HUGE contraptions to put in a 360 square foot space, where space is at a premium. Having "more stuff" also encroaches on my goals toward heading toward a minimalist lifestyle, besides I absolutely love Apartment Homesteading! So let's stretch out the lifespan of my spring onions. I live on the beach, a very high humidity area. So high is the humidity, that I have a good size dehumidifier in my small space. I keep it set between 40%-50% humidity. Those low humidity levels kill all the fleas my trusty leash-trained cat Valentino might pick up in our wild outdoor adventures. Fleas usually die from the drier air within 48 hours. Valentino is pesticide free, naturally! Humans thrive best in humidity levels between 40%-60%. Below 40% or above 60% and humans will start to get respiratory issues. I've dehydrated spring onions naturally in several different climates and humidity levels, including homes in Missouri and Kansas during the summer with the windows open to the natural air for days. Dehydrating Spring Onions, Naturally Rinse spring onions in cool water. Cut in short sections, 3/4 of a centimeter long (3/4 the width of an M&M candy). Separate the rings on the white part of the onion - they will dry out faster. Spread out on a fresh clean napkin or paper towel. Leave out to dry in a "still area" - no strong breezes, or your onions will blow away. You can check them several hours later and re-position them to speed drying time and decrease sticking to the paper. 24 hours later, shake/pull the onions off the paper. Store in an airtight container. Mine keep for up to 18 months. Great in soups! 2 Ways stretch out the 'shelf life' of fresh (not dehydrated) Spring Onions Rinse first. 1--In a cup, in the fridge with just enough water to cover the roots. Change the water every other day. Cut off the roots and the rest of the plant will take up more water easily. You can also cut off and dry the tops, leaving the rest in the fridge cup "ready to eat". 2--DO NOT cut the bottom roots or green tops off! In a cup, on the counter, near a sunny spot with just enough water to cover the roots. Change the water every day. The ones on the counter will continue growing - not only will the green tops keep growing for several weeks, so will the roots! Cut off the older green tops, as the newer ones push them out of the way, and you'll have a bumper crop of Spring Onions to dehydrate, naturally! If you have the gardening space, you could also take the onions from the counter and re-plant those with new long roots in your container garden or outside plot. Spring onions in a cup on the counter won't last forever. In my wild experiments, the farthest they got was 3 weeks. I buy bunches of Spring Onions at the local Farmer's Market for 2 for $1. As you probably noticed, they are what I call "scratch n' dent produce" (I'm a frugal minimalist, remember?). Between stretching and drying, I get 1/2 again as many as I paid for, including plenty dried for use later in chip dip, soups and Spring Onion Cheddar Drop Biscuits! Leave me a comment down below and let me know how it worked for you, or if you have any great uses for dried spring onions, please share! Blessings in Christ, Rose Marie I love that old saying!
My parents were the WW2 generation, although it wasn't a saying they said, it was one we often lived by. In our modern consumer driven, "gotta have it now" world, it's a saying that almost seems quaint. It's one I've taken to heart in growing stages over the years. I hope you find my sharing of that growth here either useful to you, or at least entertaining. Yours in God's Love, Rose Marie | 
AuthorRose Marie is an urban apartment dweller, seeking a simpler & more affordable life, through minimalism, frugality & urban homesteading, all while living in a 360 square foot apartment home with her trained cat companion, the ever affectionate Valentino. 
ArchivesCategories
|
 RSS Feed